
A flower bed idea only works if it matches the hours of light your yard actually gets, the hours you have to maintain it, and whether you are bending over a foundation bed or gardening from a balcony rail.
The same three plants, bee balm, coneflower, and milkweed, feed pollinators for months if you pack them tight in a single 6-by-10-foot space, or feed none at all if you scatter them across the yard.
1. Pollinator Flower Bed
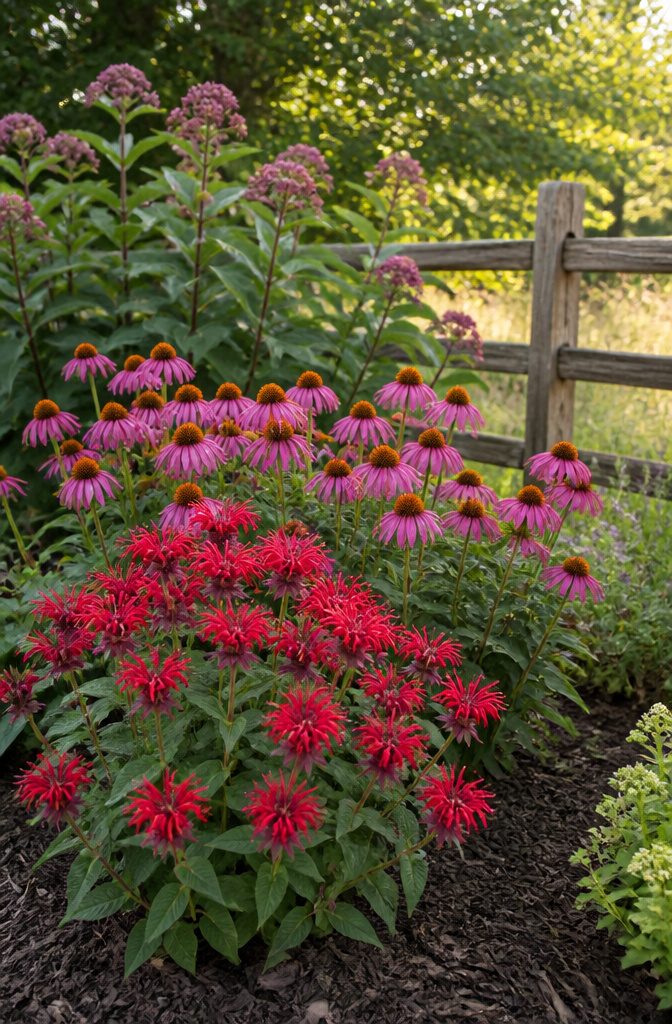
A pollinator bed only works if the flowers sit close enough that a bee can move from one to the next without burning energy crossing bare mulch or lawn.
Three plants do the heavy lifting here: bee balm, coneflower, and milkweed. Bee balm brings the red fireworks that hummingbirds track from yards away.
Coneflower holds its daisy-shaped bloom for weeks, offering a flat landing pad for butterflies. Milkweed is non-negotiable if you want monarchs; the caterpillars eat nothing else.
Grouping them matters more than scattering single plants around the yard.
A clump of five or seven milkweed stems lets a monarch female lay eggs efficiently, and the resulting caterpillars can crawl to the next leaf without dropping to the ground.
Bee balm and coneflower together give successive bloom; where one fades, the other picks up, so the bed feeds pollinators from June into September rather than offering a single week of nectar.
I learned this the hard way after planting one milkweed behind the garage and another by the driveway.
The monarchs found neither. The next spring I dug a single bed, roughly 6 by 10 feet, and packed those three species in tight.
By July the bees arrived in numbers I had not seen before. Native plants adapt to your climate without extra watering once their roots settle, and your state’s native plant society lists which regional varieties to choose.
2. Low Maintenance Flower Bed
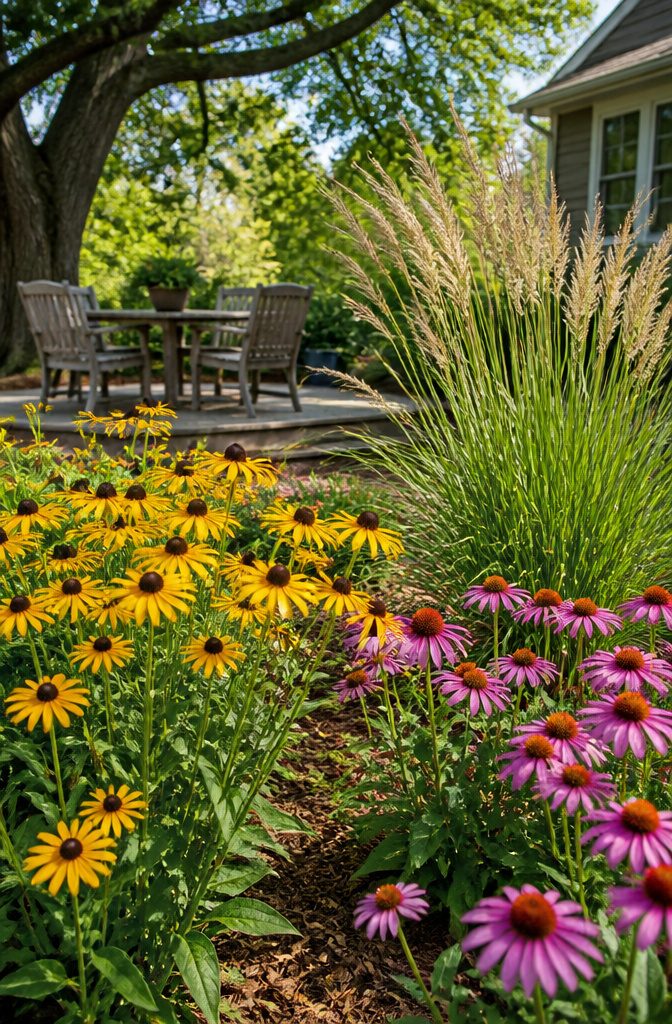
The first summer I gardened, I planted a dozen kinds of annuals that needed water every evening and still fried by August.
The next spring I tore most of it out and started over with three plants: black-eyed Susan, coneflower, and a single ornamental grass. That bed has survived every drought since with almost no attention from me.
Sticking to a small number of different plant types is what keeps the work down.
Each new variety adds its own watering schedule, its own pest watch, its own deadheading rhythm. Three or four species that want the same conditions means one glance tells you if something is off.
Native plants and drought-tolerant varieties are the practical choices here. Coneflower, verbena, catmint, salvia, sedum, and yarrow all handle dry spells without complaint.
They are adapted to local weather patterns, so they need less water and less coddling than nonnative alternatives. A two-inch layer of mulch around them suppresses weeds and holds whatever moisture does fall.
This is where most beginners should start, and where I wish I had. A bed that looks good in July without daily intervention builds the confidence to try something trickier later.
3. Layered Flower Bed
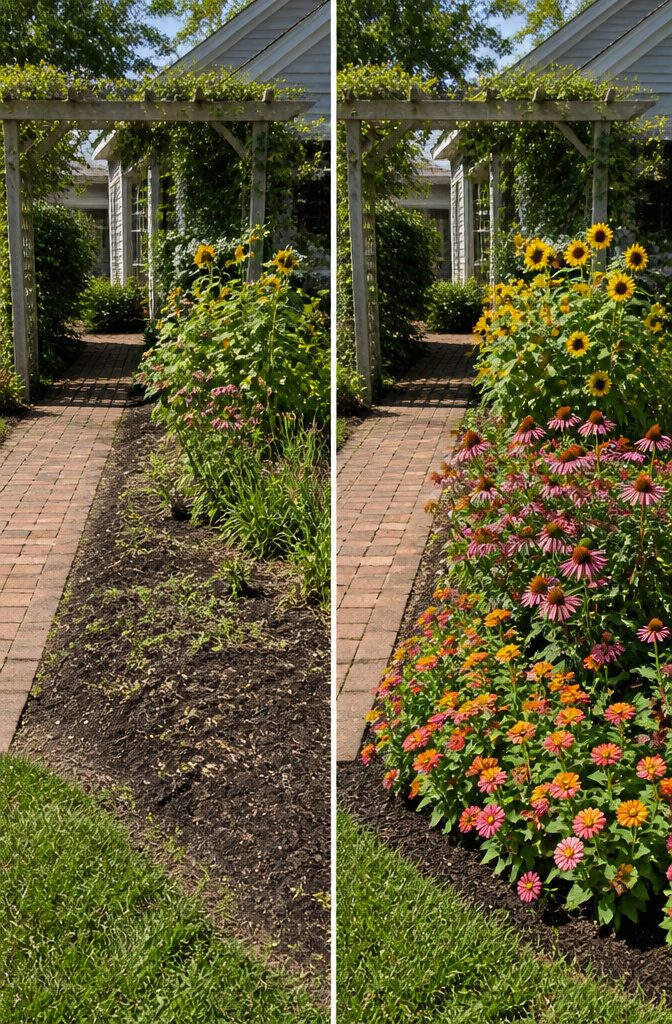
Taller plants belong at the back of a flower bed, medium-height ones in the middle, and low growers up front.
This basic layering creates depth and keeps every plant visible from the walkway or patio, which is usually why you planted them.
The rule holds whether your bed runs along a foundation, a fence, or open lawn; the "back" simply faces the wall or the property line.
I ignored this once and dropped a rogue sunflower seed into the front corner of a border I had already planted with dwarf zinnias. By August the sunflower stood seven feet high and cast a shadow over half the bed.
The zinnias stretched sideways looking for light, and the whole front half looked lopsided. The tallest plant in the wrong spot blocks sun and sightlines for everything behind it.
Shrubs or small trees can anchor the rear layer and carry the bed through seasons when annuals have finished. In the middle, billowy perennials or medium annuals bridge the height gap.
The front edge is where ground-hugging plants spill over and hide the soil. Skip the layering and you end up with a flat wall of green or, worse, a game of hide-and-seek with your own flowers.
4. Cottage Garden Style
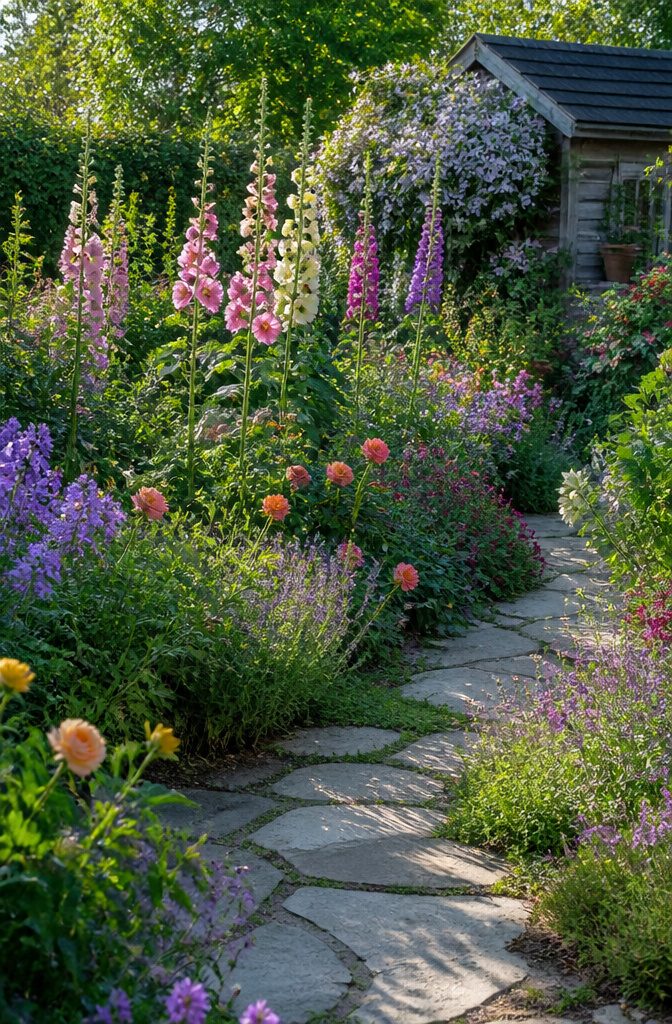
A cottage garden bed looks like flowers simply fell from the sky and landed where they pleased, but getting that effect takes more planning than the result admits.
I start with the tallest plants, hollyhocks and foxgloves, at the back or center so they do not smother what sits below them.
Roses weave through lavender, clematis climbs wherever it finds support, and the whole thing spills forward in odd-numbered clusters of three or five so nothing reads as lined up.
The color can go soft or hot depending on your mood.
Pastel schemes lean on Geranium ‘Lilac Ice’, Lavandula ‘Munstead’, and Anemone x hybrida ‘September Charm’. For something warmer, Geum ‘Prinses Juliana’ and Achillea ‘Summerwine’ add orange and red that holds its own against all that pink and purple.
The trick is mixing perennials with annuals sown straight into any bare patch that opens up, Nigella damascena ‘Persian Jewels’ or Calendula ‘Snow Princess’ filling gaps before the eye ever registers them.
That combination is what keeps color moving from spring through fall instead of giving you one good week and a long wait until next year.
5. Raised Flower Beds
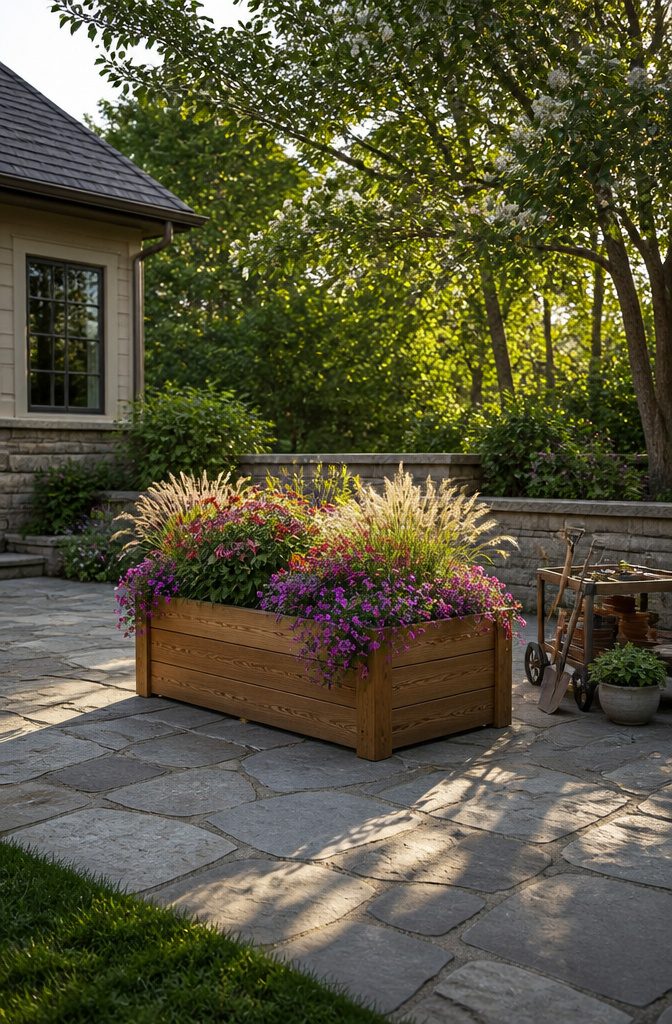
Raised beds solve two problems at once: they lift roots above soggy ground and save your back from ground-level bending.
The trade is building the box and filling it, which costs more than turning over existing soil but pays off in seasons where drainage matters.
Keep the width to four feet or less.
That span lets you reach the center from either side without stepping into the bed and compacting what you just loosened. Eight to twelve inches of soil depth handles most annuals and perennials; anything deeper is comfort, not requirement.
Materials split cleanly between what lasts and what does not.
Cedar holds up for years without treatment. Corrugated metal looks sharp and reflects heat, which can dry soil faster in full sun.
Pine I tried once because the price was right, and by the second spring the boards had warped enough to let soil spill through the gaps.
If the budget is tight, expect to rebuild sooner or spend the difference on rot-resistant lumber now.
6. Edible Flower Bed
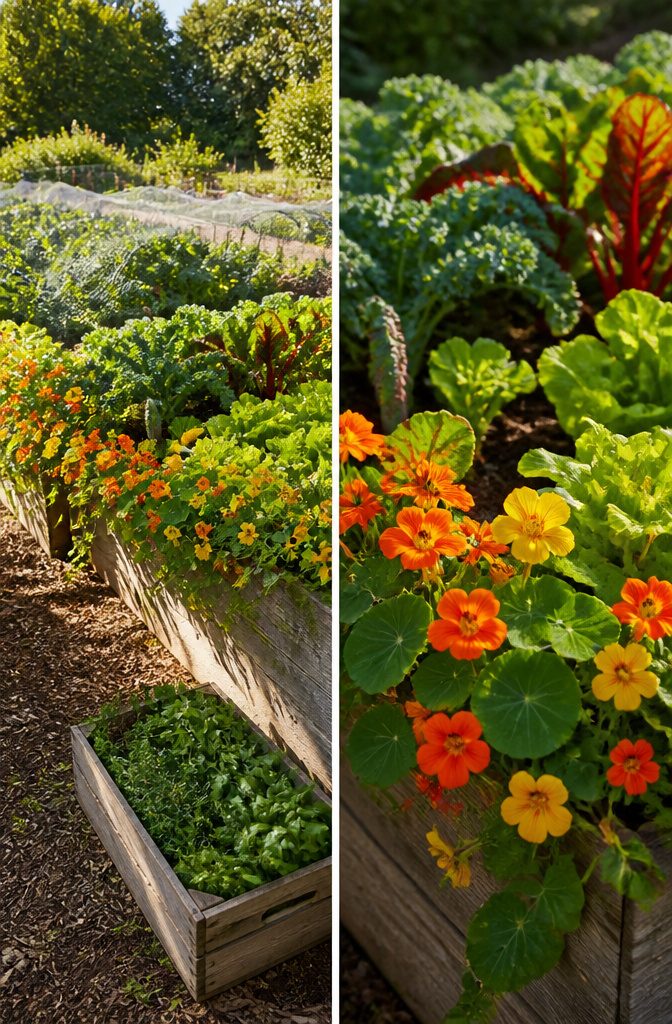
Nasturtiums trailing over the edge of a bed with lettuce or spinach underneath solves two problems at once: the flowers draw pollinators you need for squash and tomatoes, and the peppery leaves and blooms land in salads all summer.
That pairing works because both like the same cool, steady moisture and the nasturtiums’ broad leaves shade the soil so lettuce bolts slower.
Basil seemed like an obvious choice for my first edible border. It bolts the moment July heat arrives, turns leggy and bare at the base, and suddenly your flower bed looks like a failed crop, not a garden design.
Save basil for containers you can move out of sight when it turns ragged, or plant the compact columnar varieties that stay dense.
Swiss chard and kale carry a bed through months when annual flowers are spent. Their foliage reads as ornamental, especially the red and yellow stemmed chard varieties, and you harvest from the outside so the plant keeps producing.
Lemon thyme makes a low evergreen edging you can shear for cooking year-round; the variegated forms read as groundcover until you need them.
Marigolds and nasturtiums both repel certain pests, which matters when you are eating what you grow and would rather not spray.
Rhubarb, planted for its bold leaves, gives an early spring harvest and then sits as a foliage anchor the rest of the season.
The budget math is straightforward.
A $6 packet of chard seed fills six feet of border and yields cuttings for months. Replace one flat of annual bedding plants with edibles and the bed starts paying back in groceries by June.
7. Shade Flower Bed
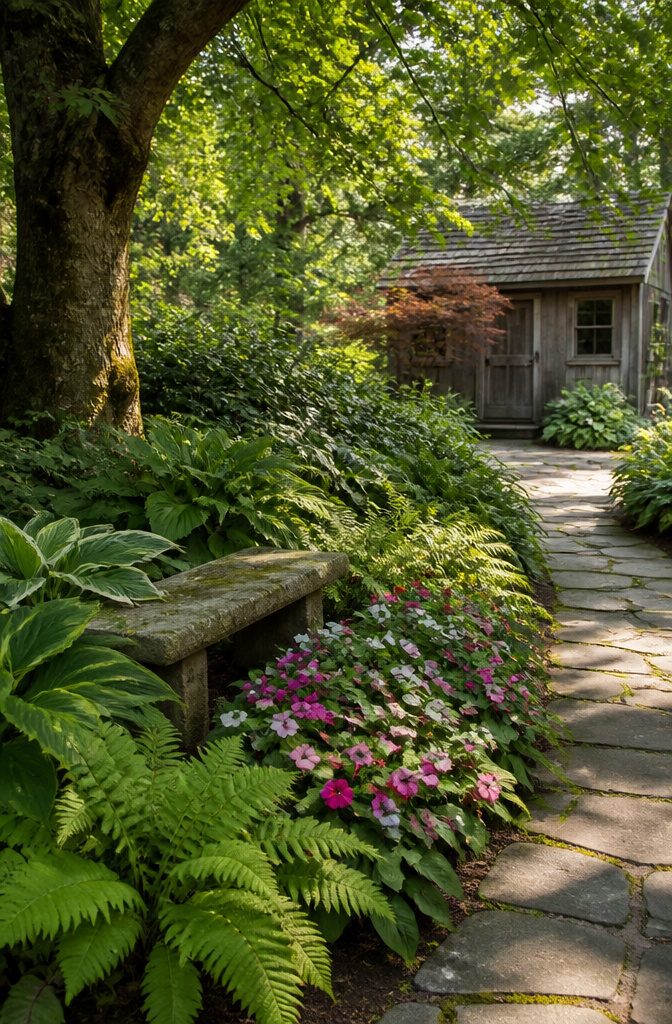
Morning light under a maple reads differently than afternoon shadow against a north-facing garage wall, and most plant tags don’t spell out which shade they mean.
"Part shade" is two to six hours of direct sun, ideally gentle morning sun rather than the burning afternoon kind.
Full shade means little or no direct sun reaches the leaves at all. Watch your spot through one full day before digging; spring light shifts once trees leaf out, and what looked bright in March can turn dim by June.
Hostas, impatiens, and ferns are the reliable backbone here. Hosta foliage carries the bed between bloom times, impatiens flower in color where little else will, and ferns give that loose, layered look that keeps a dark corner from feeling heavy.
I killed three maidenhair ferns before I accepted that not all ferns want the same thing. Maidenhair needs steady moisture and humidity; a dry shaded bed under eaves will crisp it in a week.
Christmas fern and autumn fern handle average garden soil far better. Match the fern to your actual conditions, not to the mood you saw in a magazine spread.
8. Wildflower Garden
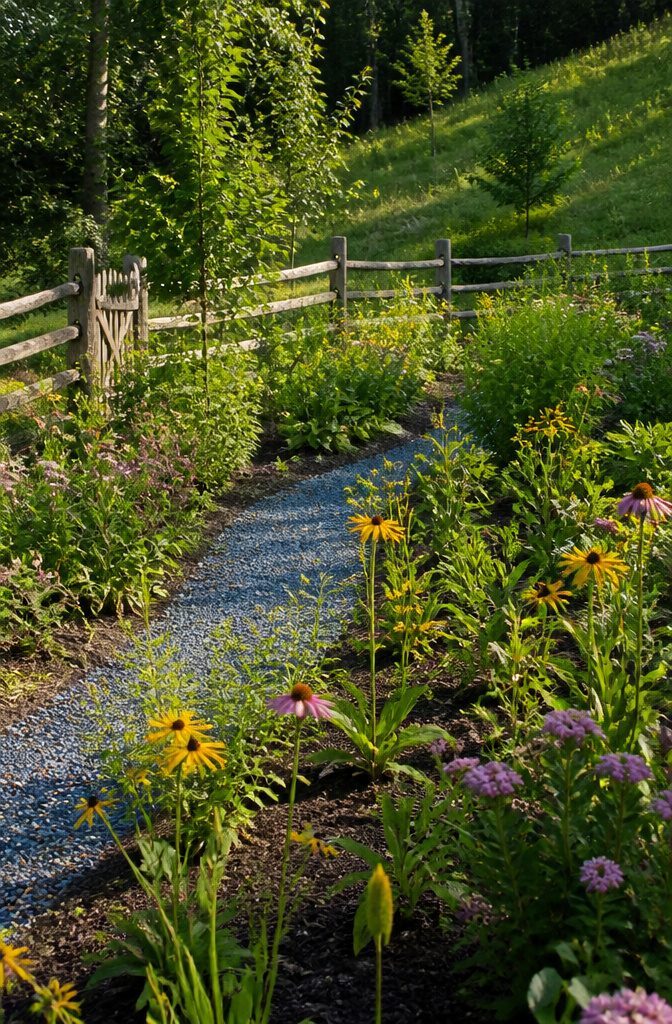
A wildflower bed looks effortless once it fills in, but the first season tests your faith.
True native seed mixes take two to three years to hit their stride, and year one mostly looks like bare soil punctuated by a few short weeds.
That "meadow in a can" product at the garden center? Skip it.
Those cheap mixes are often 90 percent annual weeds with a handful of fast-fading color thrown in. What you want is a regional native mix sourced to your state, or better yet, a curated list from your state native plant society.
I sow in late fall or very early spring, depending on the species.
The seeds need that cold, wet cycle to break dormancy. Black-eyed Susans, coneflowers, and milkweed established from seed will outlast anything I could plug in from pots, and once they settle in they need no supplemental water.
The tradeoff is patience. I remind myself that a patch of dirt dotted with tiny seedlings in July is exactly what success looks like; the show comes later, and it lasts for years.
9. Vertical Flower Bed
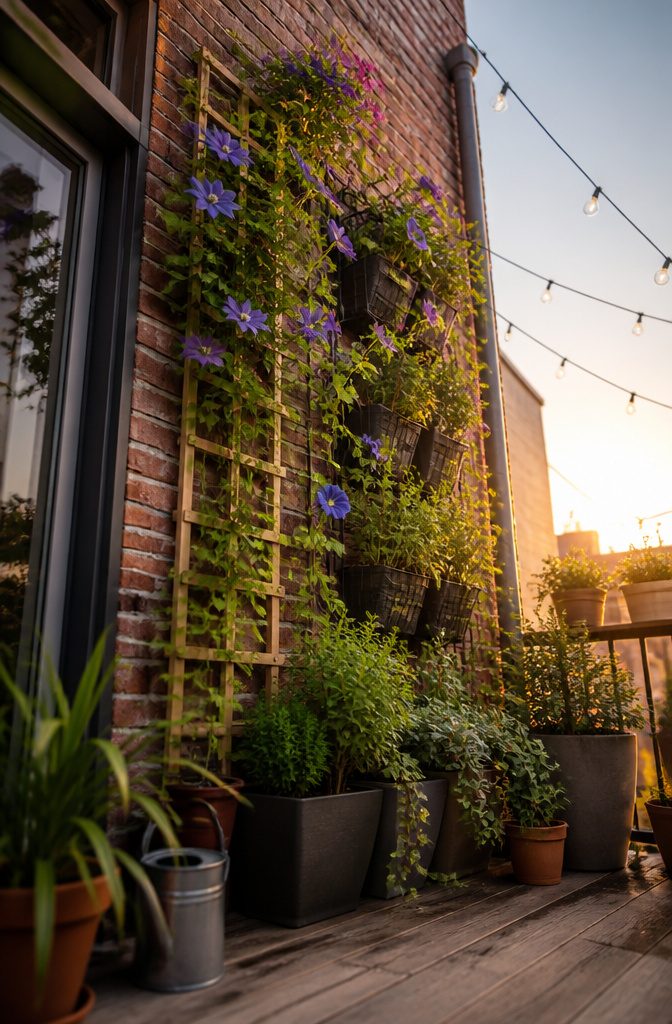
Vertical growing is the only flower bed idea that works when you have zero ground to work with. My balcony readers know this already: no dirt, no problem, but you do need a wall or railing to claim.
A basic trellis against the siding turns a few square feet of air into growing space. Clematis is the perennial I’d start with; ‘Evipo081’ stays compact and flowers red without taking over the whole rail.
Morning glory or Thunbergia alata gives you that same vertical pop for a single season if you want to experiment before committing to something permanent.
Walls without rail space call for pocket planters or a living wall setup. These systems hang, so your "bed" is the fabric or the container, not the ground.
Watering is the tradeoff: top pockets dry out fast, and bottom ones can stay soggy. Group plants by thirst if you build one, or accept that some spots will underperform.
An obelisk or small wigwam in a pot creates an island of vertical growth even on concrete.
Sweet peas climb it willingly, and the structure itself becomes the architecture of your patio. For renters, this is the movable version: pack it up when the lease ends, and the landlord never knew you had a garden at all.
10. Creative Edging
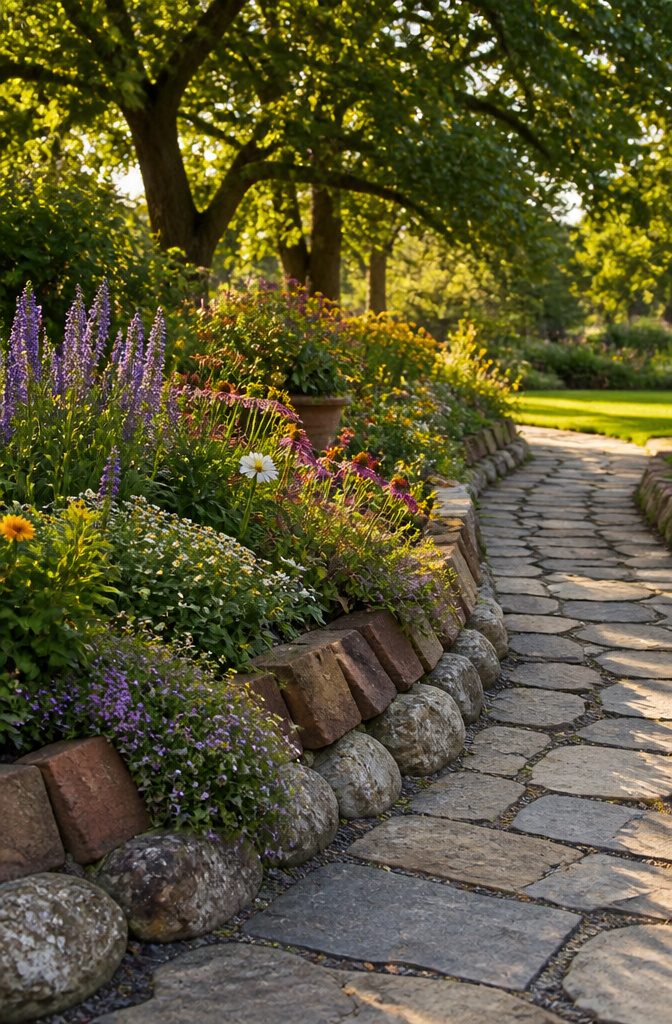
The edge of a bed is where a garden stops looking accidental. Stone, brick, wood, or whatever you pulled out of a neighbor’s renovation pile will all do the job, but they age on very different schedules.
Stone holds heat after sundown, which warms the soil along the margin and suits plants that want that extra degree.
Brick does the same. Both settle in and stay put for years if you set them with a slight tilt inward so rain runs back toward the plants, not under the edging.
Reclaimed brick or old terracotta tiles give the same structure with less mining and hauling; salvage yards stock buff, red, and blue tones you can match to existing hardscaping.
Limit yourself to two or three materials total, though, or the bed starts reading as a collection of experiments rather than one garden.
Wood is faster to install and easier to curve, but it rots on its own timeline. I once fenced a bed with pallet wood I had sanded and stained over a weekend.
It looked sharp that first June, all clean lines and the stain still even. By the following spring the boards had cupped, the cheap fasteners had rusted, and I was pulling splinters out of the soil with a cultivator.
Free had turned into a full redo. Pressure-treated or naturally rot-resistant species last longer, though any wood in ground contact is still a temporary edge compared to masonry.
For something that disappears instead of declaring itself, woven willow or pliable prunings make a low, informal border.
The panels compost back into the garden when they finally give out, and the old material can be piled in a back corner as cover for insects.
It is more work to maintain, but the replacement cost is just your afternoon and whatever the shrubs need pruning anyway.
Soil Prep Before You Plant
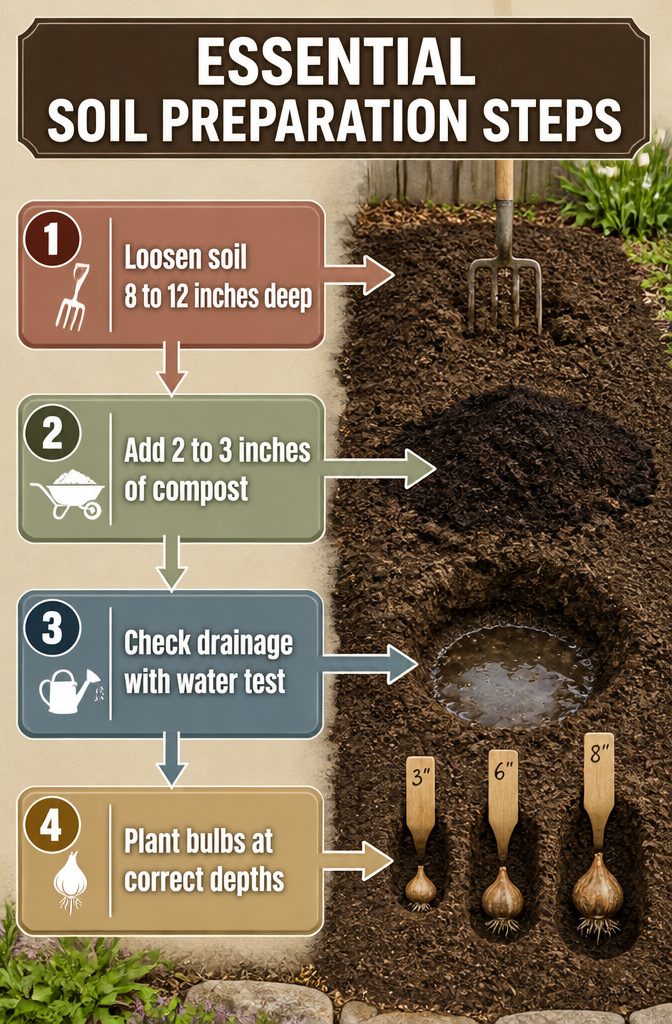
Loosening soil 8 to 12 inches deep is the step I never skip anymore, though I’ve rushed it plenty and paid for that by July.
The spring I turned over only the top four inches and stuck tulips in at a shallow angle, the summer heat cooked half the bulbs before they ever flowered.
Now I dig the full depth, break up compaction with a fork, and work in two to three inches of compost until the bed looks like moist chocolate cake rather than the clay I started with.
Drainage matters just as much as the organic matter.
I check by filling the dug area with water; if it sits for hours, I mix in more coarse material or consider raising that bed rather than fighting the spot all season.
Depth rules for bulbs are simple once the soil is ready: crocus at 3 inches, tulips at 6 inches, alliums at 8 inches. I measure with a broken stick marked at each interval, since guessing leaves me planting too shallow every time.
The extra ten minutes of prep in March is the difference between a bed that performs and one that apologizes all summer.
Picking Plants for Your Zone

The first thing to check on any plant tag is the hardiness zone range, because six hours of sun in Houston and six hours in Portland are not the same plant experience.
"Full sun" on a tag assumes moderate summer temperatures, not the 105-degree stretches that cook Gulf Coast soil. Lavender taught me this twice.
I bought two lovely silvery shrubs, ignored the fine print about heat tolerance versus mere cold hardiness, and watched them turn to straw by August both times. They had survived my winter; they could not survive my summer.
Morning light runs cooler than afternoon blasting, so a bed that gets six hours before noon supports different plants than one that gets six hours starting at two o’clock.
Watch your yard through a full growing season before you commit, since leafed-out trees shift patterns from April to July.
Perennials give the bed its bones and come back on their own; annuals fill the gaps with steady color from May through first frost.
A mix of both keeps you from staring at empty mulch half the year. Native plants and drought-tolerant species, once established, need less intervention than the showy annuals that arrive already exhausted from greenhouse forcing.
Mulch, Water, and Weeding
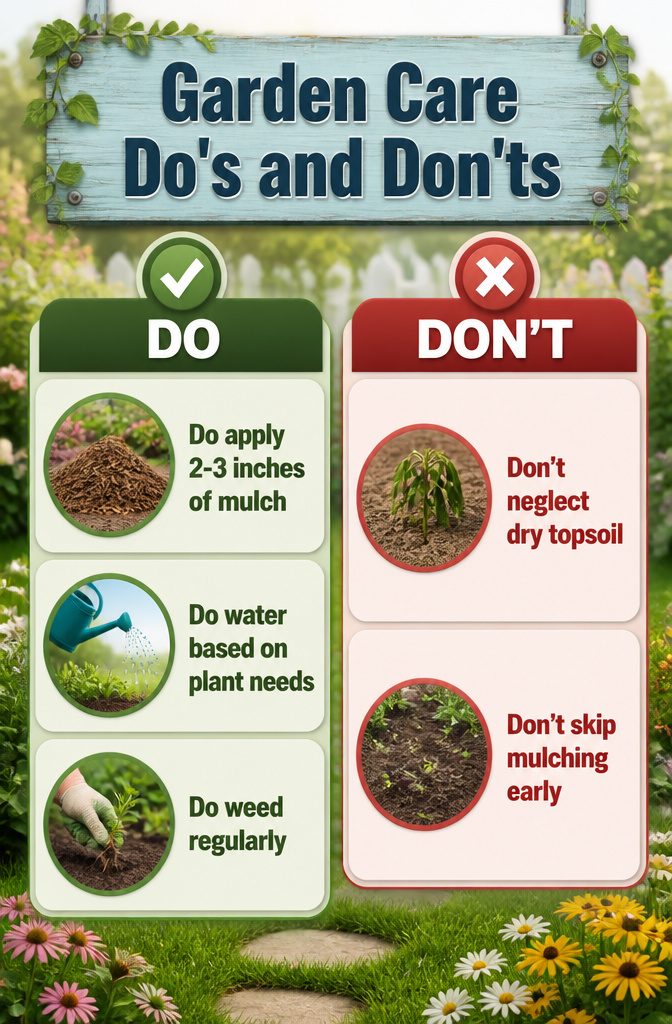
A 2- to 3-inch layer of mulch is what separates the beds that coast through summer from the ones that look exhausted by August.
I spread it early, before weeds get a foothold, and it buys me weeks where pulling anything is optional rather than urgent.
The mulch holds moisture in the soil too, which matters more than any single watering session I do by hand.
Watering goes wrong when I treat every plant the same. Grouping plants by what they actually need lets me run the hose longer in one spot and skip another entirely.
For most beds, the real signal is the top inch or two of soil going dry. Drought-tolerant plants once established get less, and I resist the urge to pamper them on reflex.
Weeding never gets easier by waiting. Fifteen minutes every few days in peak season keeps the job from turning into a back-bending Saturday I would rather spend anywhere else.
Let it slide to monthly and the roots tangle, the seeds drop, and the whole bed starts competing against me instead of working with me.
Planning for Four Seasons
The March I stood over bare dirt with a trowel and nothing to plant taught me the cost of thinking only in summers.
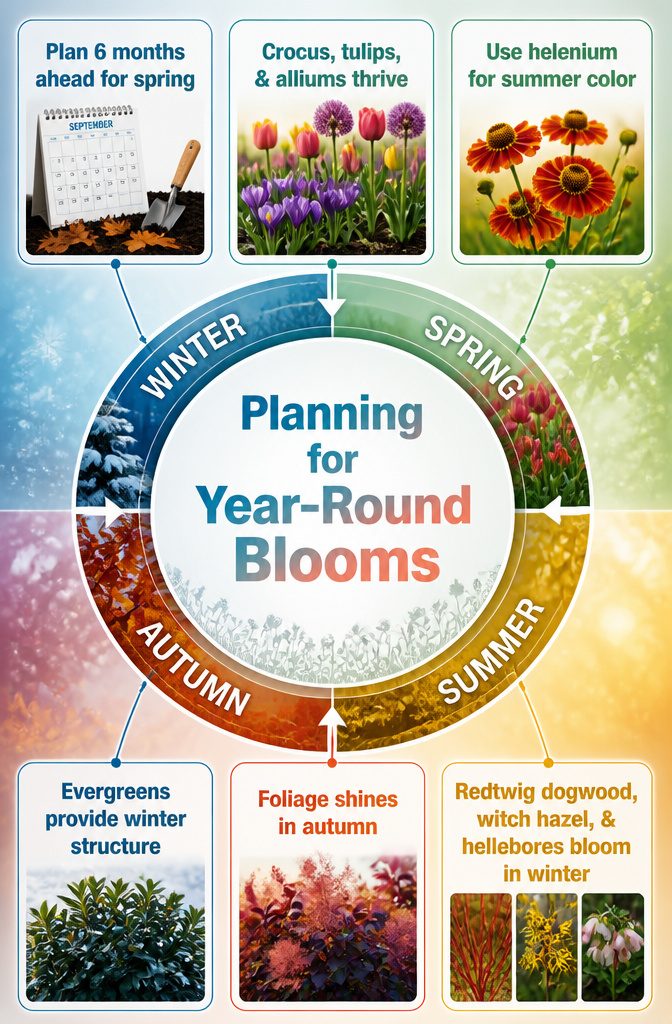
Spring bulbs need to go in the previous fall, so plan six months ahead for the first color after winter.
A bulb succession bed keeps something in bloom from late winter into summer. Crocus at three inches, tulips at six, and alliums at eight inches deep let each wave replace the last without digging up what came before.
Snowdrops and scilla push through while the soil still freezes, then narcissi and daffodils take over, then the tulips bridge toward alliums.
Summer needs its own handoff.
Helenium and Allium sphaerocephalon carry beds into late summer when earlier perennials quit. By autumn, foliage does the work a flower did: Cotinus ‘Grace’ or Physocarpus opulifolius ‘Little Devil’ turn the bed into something worth walking past.
Winter structure comes from evergreen shrubs clipped or left natural. Mahonia ‘Soft Caress’, Nandina ‘Fire Power’, or a tight Pittosporum tenuifolium ‘Tom Thumb’ hold the bed’s shape when everything else is sticks.
Redtwig dogwood and witch hazel add color against gray days, and hellebores bloom in January when the rest of the garden still sleeps.